Monday, November 20, 2017
Starter gear for C&T
Basic Starter Set:
Fencing Mask:
The masks offered by Darkwood Armory are well-constructed and at $60, the price is hard to beat. Take care to read the sizing instructions when ordering - or, if possible, purchase your mask in-person at a war (Gulf, Pennsic, etc). They are available online here: Darkwood Armory Fencing Mask.
Zen Warrior Armory also sells very well-made masks. There are a few options available on their website, but for C&T, I would recommend buying one of their stainless steel masks, which start around $100 rather than their carbon steel mask. They are available online here: Zen Warrior Armory Stainless Fencing Mask
Back of Head Protector:
The back of head protector is probably one of the trickiest pieces of C&T gear to acquire - as there are relatively few people who make them. As a result, a lot of people are going to need to make their own.
Zen Warrior Armory (ZWA Back of Head Protector) and several HEMA suppliers (HEMA Back of Head Protectors - note I have not handled any of these) make commercially available back of head protectors that cost ~$70-75. Even so, all of these require modification to meet the rule requirements for my own kingdom, Calontir - which requires that all gaps be covered. This can be accomplished for the ZWA protectory by attaching a rigid "extension" to the back edge of the fencing mask. I have seen this accomplished with heavy leather, a strip of aluminum, and a series of lamellar plates.
There are also a few people who make vacuum formed plastic back of head protectors for sale, but none of the ones I know of sell them online.
This forum has a decent amount of information about making your own back of head protector out of leather.
PLEASE NOTE that using leather as a rigid material can be fraught with problems - as leather can get harder or softer depending on use, temperature, and treatment.
This tutorial shows how to use a construction helmet to serve as a back of head protector. I've had a bit better luck by cutting more of the helmet away and adding a leather "hinge" to the top of the mask to hold it in place. My tutorial is pending.
Gorget:
Winter Tree Crafts sells a basic gorget that should work reasonably well for ~$60 (WTC Gorget).
Zen Warrior Armory also sells a gorget that works well for rapier/C&T - but I can't seem to find it on their website. The lobster gorget that I can find doesn't tend to provide adequate throat protection.
Gloves:
MiG-TiG welding gloves work reasonably well as a cheap option for gloves (NOT the super-thick gloves that people think of as "welding gloves"). They can be had for ~$10-20 (Harbor Freight TiG Welding Gloves) - though they frequently have logos printed on them. These can usually be removed with rubbing alcohol, vodka, acetone, or other organic solvent.
I personally use Darkwood's gloves (Darkwood Armory Leather Gloves). They hold up reasonably well and aren't terribly expensive (~$30) and come in colors.
Elbow Pads:
Only padding is required (not rigid material), so I've been using a pair of McDavid hex pads. However, a pair of modern skating or military surplus elbow pads should work reasonably well for getting started - just be sure that you can hide them under your garb. You should be able to buy these at Wal-Mart, a sporting goods store, etc. I've had pretty good luck at my local thrift store.
Puncture-Resistant Hood & Body Armor:
Meeting the requirement for puncture resistance typically requires 3-4 layers of medium weight linen fabric. Other combinations of fabrics can be used as well - but in all cases, a drop tester should be used on a swatch of your fabrics before you construct a garment. I generally recommend that fencers create garb items that meet the requirements for puncture-resistant body armor. Likewise, making your own hood is relatively simple for anybody who can sew. Tutorials on these items are pending.
If you want to buy a hood, the Darkwood hood (Darkwood Armory Hood) is my recommendation. It's around $35 and is made out of hemp and linen - which means it breathes pretty well.
Sword:
Swords are, of course, the expensive part. My typical recommendation is that fighters start with a 42" bated rapier with the economy hilt from Darkwood (Economy Rapier). This is an all-around functional weapon that strikes a good balance between being a good simulator of a sword and an affordable price.
If you need something significantly cheaper to get you started, however, my recommendation is one of the Hanwei practical rapiers sold by Kult of Athena (37" version and 43" version). These have a reasonably good weight and balance - however, they tend to be much floppier than I'd prefer - which may be more of a problem for the 43" sword than for the 37" one.
For a longsword, I recommend either the basic Darkwood longsword or if you want something 16th century and German, the Castille Armory Feder.
Wednesday, August 26, 2015
Geometric Construction
One of the cool things about medieval clothing is the fact that much of it can be created using simple geometric shapes such as rectangles, triangles, and trapezoids (which are ultimately a rectangle + 2 triangles). For instance, if we look at this tunic, we can see that it is made from several parts:

Body Block:
The largest of these parts is called the body block. The body block is a large rectangle used to cover the front and back side of the trunk. It can be constructed by either using one long rectangle that is folded over at the shoulders or two smaller rectangles that are sewn together at the top of the shoulders. A neck hole is cut out of the body block, however there is some variation in the shape and finishing techniques used to finish the collar. The width of the body block is calculated by measuring the circumference around the chest/bust. This should measure the largest portion of the chest which is typically under the armpit and across the nipples. I typically add about 4" of ease to this measurement in order to give me some room to breathe/take off the tunic and also add 2" of seam alloance (1" for each front and back) then divide it in half to give me the width for the body block. For example, my chest measurement is 46". I add 4" of ease and 2" of seam allowance for a total of 52". I then divide this in half to give me the appropriate width for my body block, 26". The length of the body block depends on the type of garment you are trying to make. To calculate this, take the measurement from the top of the shoulder (shoulder seam) down to where you would like the garment to end. If you are making a knee-length tunic, this should be just below the knee, for a mid calf tunic, measure to the mid-calf, for an ankle length tunic, measure to the ankle, and so on. You will also want to add 1" for seam allowance. In my case, I found that the correct measurement from the top of my shoulder to mid-calf was about 44", so I added 1" to give me 45". If I were trying to create a patter with a one-piece body block that folded at the shoulders, I would double this number and cut out a body block that is 90" long x 26" wide. If I instead wanted to make the body block in two pieces, then I would want to cut out two 45" long x 26" wide body pieces.
Sleeves:
When it comes to creating our garments, sleeves are probably the most difficult part to pattern. At the most basic level, they are tubes that our arms go in, so we could pattern them as a rectangle, however this will result in a lot of extra material at the wrist, so I instead suggest that you pattern them as a trapezoid. In order to do this, we will need 3 measurements.
In order to calculate the length, we will need to measure the distance from the shoulder seam to the wrist, however we need to keep 2 things in mind. First, we need to make this measurement along the outside of the arm with the elbow bent so that we are measuring the longest distance that the sleeve will need to cover. Second, we need to recall that our shoulder seam will occur an inch or two further down our arm than it does on modern clothing because the body block will be wider than our shoulders. If you are confused by this second point, however, it is perfectly fine to use a measurement that is slightly too long, as you can just trim off excess sleeve length when you finish the cuff. We will also want to add 1" of seam allowance as before, so for instance, while my sleeve length measurement is 22", I cut out a 23" long sleeve.
In order to calculate the width, we need to measure the largest circumference around our arm. Once again, this occurs when the elbow is bent and the bicep is flexed. We will need to measure the circumference around the elbow. I typically add 1" of ease to this measurement and 1" of seam allowance in order to calculate how wide our trapezoid needs to be at the middle of its length. In order to finish our trapezoid, we need to take one more measurement that will tell us how narrow the sleeve needs to be at the wrist. This measurement is taken around the hand because, as you will note, your hand is larger than your wrist and needs to pass through the cuff of your sleeve. You will want to add 0.5" of ease and 1" of seam allowance to this measurement. My elbow circumference measurement was 16" to which I added 2", giving a total width of 18". My hand measurement was 10.5", to which I added 1.5", giving a total width of 12". You will note that the 18" measurement needs to be the width near the middle of the trapezoid, so the width at the shoulder will need to be wider. In order to calculate the width at the shoulder, we can simply calculate the difference between our elbow and wrist measurements (18" - 12" = 6"), divide that in half (6"/2 = 3"), and add that to the elbow measurement (18" + 3" = 21). So, my sleeve needs to be a trapezoid that is 23" long and that is 21" wide at the top and 12" wide at the bottom.
Gussets:
Gussets are small squares that help to add a bit of extra space to the base of the sleeve in order to allow for movement. While it may be tempting to simply include them into the sleeve, it also wastes fabric. Gussets should be about 6" square.
Gores:
Gores are triangles that are added to the sides and/or inserted into the middle of the body block in order to flare the bottom of the garment out and to add fullness in a fabric-efficient manner. While there are examples of dresses with as many as 12 gores, a fairly typical arrangement involves 4 gores, with one gore attached to either side of the body block, and one gore inserted into the middle of the front and back parts of the body block. The insertion of these "center gores" is done by cutting a slit into the body block. You can see an example of this in the picture of the Bocksten tunic above.
Patterning gores is relatively straightforward. The overall shape for a gore is an isosceles triangle, however cutting out this shape is relatively wasteful of fabric. I prefer to cut each gore out as a pair of right triangles by making a rectangle with the appropriate length and height, and then cutting it along the diagonal. These right triangles can be sewn together along their long edge (not their hypotenuse) in order to form an isosceles triangle-shaped gore.

The length of each gore will depend on where the flare is intended to start and where the garment will end. If I wanted a gore to go from my natural waist and the garment was supposed to reach mid-calf, then I would measure the distance from my natural waist to mid-calf. I would then add 1" of seam allowance to this dimension. The width of each gore part depends on exactly how much fullness I want to add to the garment and to some extent, how much fabric I have left. If making the gores slightly smaller means that I can use 2.5 yards of fabric instead of 3 yards, then I should make them narrower. In my repoduction of the Bocksten tunic, I ended up having a measurement of 32 inches from waist to mid-calf, so I ended up with 33" long gores. I ultimately chose to make each gore about 18" wide, so I divided that in half and added 1" of seam allowance, meaning that for each gore, I cut out a 33" x 10" rectangle and then cut that in half along the diagonal.
Layout:
Now that we have calculated the sizes for each of our pieces, it's time to consider how to lay out those pieces on our fabric. Typically linen and wool come in 60" wide pieces. Fabric should be pre-washed in the same way that you intend to wash the garment. I tend to wash the fabric with hot water, then machine dry. This tends to shrink the fabric somewhat, and I have found that 60" wide fabric shrinks down to about 56" after pre-washing. As a result, it is important to plan for this. The ultimate goal of planning our fabric layout is to determine how much fabric we need to purchase. We therefore want to be efficient with our layout so that we don't buy more fabric than we need. An example layout for a tunic based on my measurements is below. You will note that the length of the body block tends to determine how much fabric I need to purchase, and at 90", this suggests that I need to 2.5 yards of fabric in order to make my tunic.

Monday, August 17, 2015
Buying it: High Medieval Men's Clothing
While there is certainly a lot of pressure in the SCA and other reenactment/cosplay groups for participants to make their own clothing and accessories, it isn't necessary and is not the best solution for everybody. I have mentioned this in several other places on this website, but ultimately for those who lack the time and/or interest in making their own clothing, it is perfectly acceptable to buy what you need. However, purchasing medieval clothing can come with several pitfalls and it is easy to spend a lot of money on clothing that is of poor quality and that isn't authentic. As mentioned throughout the "First Garb on a Budget" series, authenticity, quality, and price are often competing goals, however, I have gone on a virtual shopping trip in order to help take some of the guess-work out of balancing these priorities. To do this, I provided myself with several limitations:
1) Items must be purchased from permanent merchants - I limited my shopping to online merchants who have been well-established within the SCA community and to those where I expect that anybody who is reading this article could follow the link to purchase the same item at any point in the foreseeable future.
2) Items should be off-the-rack - Given that one of the primary reasons for purchasing clothing rather than making it is time constraint, I have prioritized items that are available off-the-rack rather than custom-made pieces. Off-the-rack pieces also tend to be cheaper, which is another advantage.
3) The outfit must include all of the necessary layers and parts - Simply put, it is easier and cheaper to look good by wearing a simple version of all of the right things than it is to disguise the absence of an important part with bling.
4) The number of unique merchants should be limited - this should help to keep shipping costs down.
5) The selected clothing items should be reasonably authentic for the period between 1100 AD - 1350 AD.
6) The outfit should include the basic accessories - Long story short, a medieval person without shoes, a belt, and a head covering isn't dressed.
Trade-offs:
In order to balance the competing goals of authenticity and cost, there are a couple compromises that you might consider. First, some of the items in the list above aren't strictly necessary. You won't need a hat if you have a hood and coif, for instance. Likewise, the cloak, shoulder bag, knives, and belt pouch can be considered to be optional, however you may also decide that they are necessary from a practical standpoint. I will list these items below as optional rather than as part of the basic outfit. Second, you might consider buying outer garments that are made out of linen rather than wool. This is common in the SCA, but it may not be acceptable for other reenactment groups because it is not an authentic practice. Linen tends to be a little cheaper and slightly cooler than wool (though wool is surprisingly breathable and I prefer it to cotton even in the summer). My list below will provide both options so that you can see how this affects price and make the decision for yourself.
Where to Buy:
While there are a multitude of merchants who sell medieval clothing, I have selected only three of them based on their reputation for quality, customer service, authenticity, and price. Furthermore, by limiting the number of merchants, we can save money on shipping. I ultimately chose Historic Enterprises and Linen Garb for clothing items and Viking Leather Crafts for the leather goods. I generally find that HE's clothing is more authentic than LG, but for some items there is a significant cost difference, and so I have included both below:
Underwear:
Underwear Package with Linen Chausses - $134.95
Underwear Package with Wool Chausses - $139.95
Outerwear:
Buy Separately:
Tunic:
Basic tunic from Linen Garb - $59.00
Basic linen tunic from HE - $89.95
Basic wool tunic from HE - $164.95
Coif:
Linen coif from Linen Garb - $10.00
Hood:
Linen hood from Linen Garb - $39.00
Wool hood from HE - $47.95
Buy a Package:
Bocksten Package - linen tunic, linen coif, wool hood - $153.95
Bocksten Package, wool tunic and hood, linen coif - $224.95
Accessories:
Shoes: Viking Leather Crafts has several shoe options. If you're going for a specific century, follow the headings on this page. The shoes start at $54.95, but I recommend purchasing the rubber half-sole for an additional $15, which will improve your traction on grass and also increase the lifespan of your shoes as gravel and pavement are very hard on leather soles. Total: $70
Belts: Viking Leather Crafts offers several belt options. As a general rule, medieval belts were rather narrow, so go with the 1" or 3/4" belts available here for $29.99 or $21.99 respectively.
Optional Items:
Belt Pouch: I debated whether to include this as necessary or optional because you'll want somewhere to put your wallet, keys, etc. Viking Leather Crafts provides several options, and you may as well order at the same time as your shoes and belt. Price: $29.95
Hat: Historic Enterprises Felt Hat - $21.95
Shoulder Bag: Historic Enterprises Forage or Pilgrim Bag - $24.95
Striking a Balance:
Using the options above, it is easy to see that the cheapest outfit consists of the linen underwear package, the linen tunic, coif, and hood from LG, and a pair of shoes and a 3/4" belt from VLC. The total for that outfit ends up being $334.85 + s/h. However, my personal recommendation would be to splurge just a little bit and to go with the wool chausses and hood from HE, which would add $5 to the total for the chausses and $8.95 for the wool hood instead of the linen one for a total of $348.80. You also may decide that you want a 1" belt rather than a 3/4" belt, which ends up adding another $8.
Depending on your priorities, however, you may find that you're willing to pay a little extra for more authentic clothing. In which case, you might consider the outerwear package deal from HE. It doesn't end up being much more expensive, coming in at $380.80 for the linen underwear and outerwear package + shoes & belt or $385.80 if we get wool chausses. Both versions include a wool hood as noted above. So if we consider the price difference between this package and my recommendation above, we're looking at a difference of $37. This would allow us to save on shipping from LG, which is currently $10 for the items on our list, resulting in a $27 difference in cost, which you will note, is essentially the difference in cost between the tunics.
Based on the above numbers, you can also see how much more expensive it is to purchase all of the appropriate pieces in wool. We'd essentially be purchasing the HE undergarment and outer garment packages in wool, which would run $456.8 total including shoes and a 3/4" belt or $464.80 with a 1" belt.
Conclusions:
For starters, it should be clear that one of the first considerations in purchasing garb is to establish a budget and consider the degree to which you are willing to make trade-offs between cost and authenticity. My findings suggest that a basic outfit can be accomplished with a budget of about $350, though this involves compromising authenticity in terms of material (choosing linen) and construction (LG vs. HE's tunic and hood construction mainly). For SCA purposes these are completely reasonable compromises, but will likely result in an outfit that is not acceptable for stricter reenactments. If we instead consider a $400 budget, then we still will likely need to compromise on material, but we can expect to be able to also purchase some of the more optional items. I would recommend starting with a pouch, as it really is helpful to have somewhere to put your wallet. If our budget is instead closer to $500 or more, then we can afford to purchase the appropriate garments in wool and can also afford some of the optional accessories.
In general, the idea behind this guide is to get a newcomer started. For the vast majority of SCA events, a single outfit is sufficient clothing, as most events occur on a single day, two at the most. However, eventually you may decide to attend one of the SCA's larger week-long wars such as Pennsic, Gulf Wars, Estrella, Lillies War, etc. For these events, wearing a single outfit for a week is going to make it difficult for you to make new friends (and also to keep the ones you already have), so you will need even more clothing. One of the benefits of the outfit and options that I have written about here is that it is modular. By this I mean that you will only need multiples of certain items and that you should be able to mix and match those items as needed. For example, you probably only need 1 pair of shoes, 1 belt, and 1 hood because if you stick with the same time period, you will be able to wear those items with different tunics, etc. So, how do we expand this individual outfit for going to a week-long war?
The "War-drobe"
As noted above, you only need one pair of shoes, one belt, one pouch, one hood, one hat, etc. However you will need several sets of clothes, as otherwise, you're going to get stinky. In general the primary cause of clothing getting dirty is our bodies, so it is the layers that touch our skin that will get the nastiest. Therefore, we will need more underwear than anything else. I generally recommend no fewer than 3 sets of underwear. Historically the layers of clothing that touch the body were made from linen precisely because linen can be boiled in a pot and left in the sun to dry. There was no need to dye this fabric, as this treatment would ultimately bleach it in the sun. We can do something similar at war by rotating through our clothing, wearing 1 set, letting another one air out in the sun, while keeping a third set dry in our tent in case it rains.
We need fewer outer garments because they aren't in direct contact with our body, so I recommend at least 2 outer tunics. I also recommend more than one coif, as it will pick up oils from your hair, but you can probably get away with only having 2.
There are a few other ways to stretch your clothing. For starters, wool is much better at resisting moisture than linen. As a result, wool chausses, tunics, and hoods are going to stay fresher over the course of the war because they will resist dampness in the air and will wick sweat rather than absorb it. Wearing modern clothing as an additional under-layer can also help stretch your medieval clothing. Most people are wearing modern underwear beneath their braies and while many do it for comfort, it also helps to keep your braies from getting quite as funky. Another trick is to wear a pair of wool hiking socks underneath your chausses. They will help keep your feet dry, provide a bit of extra padding for your feet, and can generally be dried out quickly using the same method as the one used for the other undergarments.
Overall, my recommendations for a week-long war are therefore 3 shirts, 3 pairs of braies, 2 pairs of chausses (if they are wool or we use the hiking sock trick, otherwise we'll want 3 pairs), 2 tunics, 2 coifs, one hood, one pair of shoes, one belt, one of any accessories that you may have. In other words, starting from our basic outfit, we would need to purchase 1 additional tunic, 1 additional coif, 1-2 additional sets of chausses, 2 additional shirts, and 2 additional sets of braies. We could accomplish this by purchasing 2 of HE's basic underwear packages (I do recommend the wool chausses) for $139.95 each, a tunic from LG for $59, and a coif from LG for $10 for a total of $348.90. If we really needed to cut costs, we can save some money by buying only 1 additional complete set of underwear and 1 of HE's basic underwear sets that do not include chausses at $89.95. This would result in a total cost of $298.90. If we put everything together then we can see that enough garb to attend a week-long war will run a minimum of $633.75.
Friday, May 1, 2015
Braies
Simply put, braies are medieval boxer shorts. Braies would have been constructed from linen and typically would have been undyed or bleached white. Combined with a linen shirt, braies would have comprised a linen base layer that would have been more comfortable to wear against the skin than wool and which would have been more easily washed. Neither of these garments were found intact on the Bocksten man, however linen tends to be more susceptible to rotting than wool or leather, and so it is reasonably likely that these garments rotted away. It is also possible that the Bocksten man was not wearing a linen underlayer, however there is plenty of evidence from other sources to indicate that such garments existed and were worn.
Wool or linen chausses would have been used to cover the foot and lower leg and would have been pulled over top of the bottom edge of braies such that the entire leg was covered. These chausses would have been tied to a belt at the waist that may or may not have been part of the braies.
There is some debate concerning the appropriate method of constructing braies and over whether they were a pair of sewn "pants" or whether they were actually accomplished by simply cloth wrappings, similar to the undergarments worn by ancient Romans. Accomplishing such cloth wrapped braies is rather simple, as it involves the creation of a single rectangle of fabric approximately 60" x 40"-50" which is conveniently about 1.5 yards of linen fabric. This cloth rectangle is then wrapped around the body and rolled over a belt. The link below provides a picture tutorial along with instructions (that appear in Swedish and English). Getting the exact measurements probably takes a little playing with the wrapping process and a little practice, but once you've figured it out, making this style of braies is as simple as cutting the fabric to size and finishing any raw edges by rolling the fabric over twice and stitching into place.

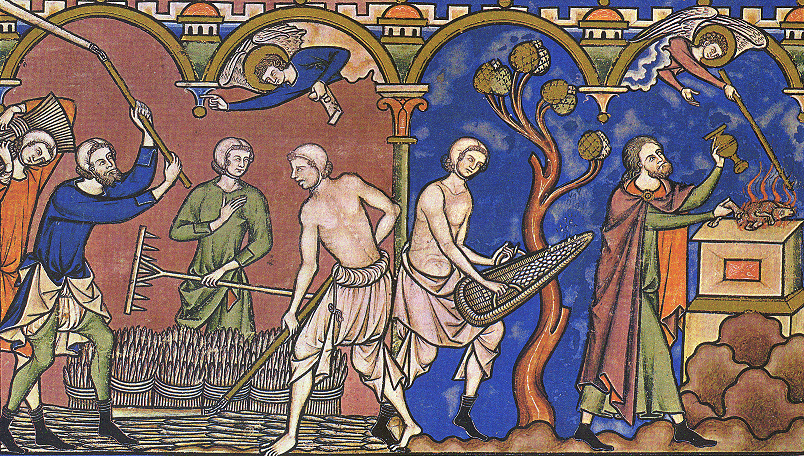 |
| Farm workers wearing only their braies. Image from the Maciejowski Bible, a 13th century manuscript. |
Wool or linen chausses would have been used to cover the foot and lower leg and would have been pulled over top of the bottom edge of braies such that the entire leg was covered. These chausses would have been tied to a belt at the waist that may or may not have been part of the braies.
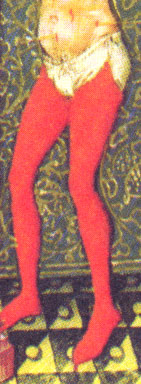 |
| Braies and Chausses tied at the waist band. |
There is some debate concerning the appropriate method of constructing braies and over whether they were a pair of sewn "pants" or whether they were actually accomplished by simply cloth wrappings, similar to the undergarments worn by ancient Romans. Accomplishing such cloth wrapped braies is rather simple, as it involves the creation of a single rectangle of fabric approximately 60" x 40"-50" which is conveniently about 1.5 yards of linen fabric. This cloth rectangle is then wrapped around the body and rolled over a belt. The link below provides a picture tutorial along with instructions (that appear in Swedish and English). Getting the exact measurements probably takes a little playing with the wrapping process and a little practice, but once you've figured it out, making this style of braies is as simple as cutting the fabric to size and finishing any raw edges by rolling the fabric over twice and stitching into place.
Cloth Wrap Braies

Braies can also be sewn together to form a pair of short pants as we might think of them modernly. This site: sewn braies provides images of several types of braies along with the patterns for making them. Their recommended pattern shown below is essentially a rectangle for each leg and a square gusset in the crotch. You might slightly improve this pattern by adding about two inches in length to each of the leg pieces and then rolling the waist band back over itself to form a channel for a waist band.
Striking a Balance: Buy it, Make it, Trade it
Getting started in a reenactment organization can be a daunting task. Putting a complete kit together often requires a newcomer to not only acquire clothing, but also accessories such as shoes and belts, armor, weapons, camping gear, etc. One of the strengths of the SCA is its relatively low bar for entry (an attempt at medieval clothing). Likewise, the SCA is in many ways an organization for people who make things, and so many newcomers will find plenty of people who are quite willing to help them learn to make their own equipment. Unfortunately, this attitude sometimes results in a lot of pressure for newcomers to make all of their stuff. It seems obvious that making things yourself is cheaper than buying them and likewise, that this would lead a website that is geared towards helping newcomers put together their first kit on the cheap to also support this line of reasoning. However, the reality is not nearly this simple and in many cases it is far better for people to simply buy some or even all of the gear that they need.
Why would this be the case?
Well, for starters, we need to recall a previous post where we discussed that every project must balance time, monetary cost, and quality. As stated before, you can have things good, fast, and cheap: pick two. In the case of the imaginary newcomer that this site is geared towards helping, we must remember that they do not have an abundance of free time, free cash, or crafting skills. Therefore, if we focus solely on reducing monetary costs, then we must either expect to spend a lot of time making things or we must choose to make low quality stuff. In general, this series tries to balance these two things. Certainly making things requires some amount of time. This is kept to a minimum by keeping things simple (one form of reducing quality). However, sometimes making things isn't really an option. This may be because the piece of equipment is complicated, takes specialized skills, and sometimes it's because you can't buy the materials for the price of buying it.
When should we make things?
1) When we want to: Doing things is kinda the point of the SCA, and crafting can be incredibly rewarding. If a particular craft is something you're interested in and if an item is something that you want to make, it may be worth prioritizing making the item (at the expense of time and possibly quality). Certainly, however we must temper our choices with a solid dose of reality. It is certainly feasible for your first garb project to be a full Elizabethan gown, but given how complicated such a garment is, you would need to be realistic that either the project won't turn out very well or it will take an extraordinary amount of time (while you essentially learn how to sew). Keep your early projects simple and work towards projects that your skills will allow you to successfully complete in a reasonable time frame. Remember, you're going to want your gear sooner rather than later.
2) When we don't hate doing so, and:
- Buying is too expensive: If your budget is really small, you don't really have many other options than to make things yourself. At the extreme end, it may be worth considering whether the SCA is a hobby that you can afford at all. Ultimately hobbies are luxury items, and if you're making a choice between eating this month and buying fabric for a tunic, your priorities need to be reevaluated. Even making things yourself has a cost (materials, tools, instruction, time), and while the SCA tends to extol the virtues of upcycling, recycling, and repurposing mundane objects and materials, the reality is that doings so is actually fairly difficult and requires a skilled craftsperson, not a novice to pull off well.
- It can't be bought: Simply put, some personas are more popular than others. Merchants tend to have those personas covered pretty well, so if you're looking for viking or 14th century stuff, it's almost certainly available for purchase somewhere (and it's probably better than you'll make on your first attempt). However, SCAdians like to be different, and for many people, this expresses itself in their choice of persona. If you're trying to be something less popular, however, you might not be able to buy the gear you need to complete your kit. From the perspective of keeping costs down, an important consideration is to choose a persona that is popular so that you can benefit from the myriad of freely available research, inexpensive "starter"-level gear, and crafting help.
- It's a group project: Sometimes local groups get together to make a whole bunch of a particular gear. Shoulder bags, coifs, veils, and banners are popular choices, but entire outfits and even armor are sometimes built as a group activity. You should try to take advantage of these opportunities to make things even if you aren't very experienced or aren't particularly keen on that form of crafting in general, as the group atmosphere can make things more enjoyable, and making things as a group tends to mean that expertise, tools, and materials will be available for free/cheap.
When should we buy things?
1) If you dislike making things: Seriously, if you absolutely hate sewing, just plan on buying your clothes. It isn't really worth the stress, aggravation, etc and you're reasonably likely to be happier with the final product made by someone who 1) has experience making things and 2) doesn't hate it. Remember that your time has value, and if you're spending your time doing something you hate, you may as well just get an extra part-time job. Of course, this approach requires us to make compromises. One of the big ones is that you're likely going to be limited in the period of clothing that you can accomplish without spending a bunch of money. Clothing gets increasingly complicated starting around 1350, and much of the later clothing requires an individual fit, which makes buying clothes off the rack difficult and expensive. At the same time, earlier medieval clothing is fairly simple, isn't personally tailored, and is relatively inexpensive to purchase.
2) If you don't have time to make things: Obviously if time is your limiting factor rather than cash, by all means, just buy what you need. There are a few variations on this, however. For instance, if you're spending your time sewing your clothes, you might elect to simply purchase a belt and/or pouch because you don't have time to learn an additional crafting skill. You also might find that some tasks aren't really worth your time. For instance, my wife does tablet weaving and offered to make black twill tape for use as trim on a pair of pants that I'm planning. However, she has plenty of other projects on her schedule and the twill tape itself is fairly cheap to just buy, so it probably isn't worth it for her to weave it by hand. Similarly, many medieval notions can be made (hooks and eyes, buttons, lacing cords), but sometimes it might just be worth buying, as these are often cheaper than the time-cost of making them. This also has particular relevance to newcomers. As you are putting your first kit together, you, by definition, don't have things to wear in the mean-time. If a project is going to take you months to complete, you might find that buying it is a better option so that you have it now rather than later.
3) If you lack the necessary skills/tools: To a certain extent, it is expected that you can learn quite a bit by attempting to make things, but some projects are more complicated than others. Basic sewing and armoring projects can be carried out using fairly minimal tools and without much previous skill, but putting together a full suit of plate armor requires quite a bit of time, skill, and certain specialized tools that probably end up costing more than the armor itself. It is important to be realistic about what skills you can acquire given your resources (are you teaching yourself, or do you have an instructor?) and time-frame (Can you wait 5 years to get into your first garb?).
4) If it's not worth it: Sometimes you'll find that buying something is cheaper than buying the materials or you'll find that the difference in cost between the finished product and the materials is so small that it's just worth buying it. Similarly, if something takes a lot of skill to make and can be bought rather cheaply, it's worth just buying. Consider shoes. Shoes are usually made of leather and often require several different types/thicknesses of leather. Leatherworking requires some tools certainly, but leather is often only sold in full hides, so a single pair of shoes might require you to buy $300 worth of leather, even though you'll only use a little bit of it. Furthermore, you'll expect to pay about $8-10/square foot for the leather, and a pair of shoes uses 5-6 square feet. If you consider this material cost and compare it to the cost of purchasing period shoes (about $75), you'll see that 1) You have to buy a lot more materials than you'll need at significant cost and 2) There isn't much savings from making it yourself. Finally, shoes are a bit tricky, and if you don't get a good fit, you'll end up in quite a bit of pain. Coming up with a good pattern for your feet will waste quite a bit of materials as well (good thing you got a whole hide). Because of this, you'll typically find that it isn't worth the hassle of making your own shoes.
What about barter?
SCA members often suggest barter as a way of keeping costs low, but on the face of it, this isn't necessarily a feasible plan for newcomers. For starters, there's often the assumption that the parties are exchanging goods that they have created, for instance, trading leatherwork for clothing. However, our proverbial newcomer doesn't necessarily have other skills with which to make things either, so they can't trade a belt for a tunic, because they don't know how to make either. That being said, bartering labor for gear may be a reasonable task. This labor may not be in the context of the SCA. You might find that someone's willing to make you clothing in exchange for mowing their lawn, cleaning their gutters, etc. Similarly, there are lots of camping events, and often people are willing to trade garb, armor, a place to sleep, etc for people to cook meals, wash dishes, setup and tear down tents, and watch their kids. At major wars, there are even merchants who hire people to man their booth who provide clothing, meals, etc to the people who work for them. These arrangements ultimately are on an ad hoc basis, however, so there's nowhere I can point you to in order to find them. You'll have to ask around on your own.
Saturday, November 8, 2014
Where to buy stuff on a budget:
Where to buy stuff on a budget:
Sometimes it is better to just buy the things we need for our kits. I have provided an annotated listing of merchants and products that I think strike a good balance between quality, authenticity, and price below.
Armor:
Starter Helmets:
These three starter helms are essentially equivalent. All 3 options are reasonable for the mid-14th century kit that I recommend for garb and armor on a budget. Your decision probably comes down to wanting a bar grill vs. the face plate that is on the Blackbird Armory helm. Obviously Accdntprone's ordering is a little more complicated (you need to send him a personal message), but as far as I can tell from reviews, he makes a good, solid helm. If you're looking for an earlier period helm (spangenhelm), I think Accdntprone also offers those as starter helms.
Other Armor:
The Armour Archive is the #1 go-to place for armour questions, buying armor online, etc. The forum has plenty of armour for sale, reviews of armourers, etc.
Mad Matt has a good reputation on the Archive, and offers a good mix of inexpensive armor pieces and much pricier custom work.
Rough From the Hammer specializes in selling pre-formed armor parts. The parts are left unfinished, which means that you'll ultimately need to do the final polishing, strapping, etc yourself.
Greaves (lower leg protection): Field Hockey Shin Guards
Greaves aren't required armor for SCA combat, but they can be a really good idea. The lower leg and calf has a fairly complex shape that makes steel armor greaves fairly pricy. Likewise, trying to form your own plastic greaves is also somewhat difficult. Some people use soccer shin guards, as these are a readily available commercial product, however they tend to be somewhat bulky. Field hockey shin guards like these, however are very low-profile.
Fencing Gear:
Masks:
The most important thing you need to pay attention to is the sizing. You should make sure you get a mask that fits (which is to say it should probably be tighter than you think it should).
Zen Warrior Armory makes really good fencing masks. You might notice I didn't list their cheapest mask, and that's because I think that having a stainless steel mask with a tighter weave is worth the extra money.
The Darkwood masks seem reasonably sturdy. They're priced pretty cheap for a stainless steel mask. All around, they're probably a solid choice.
Both merchants offer a rigid back of head protector for their masks (for Cut & Thrust). Ultimately, if I were just starting out, I'd probably just buy whichever one allowed me to combine shipping with other items.
Gloves:
The Darkwood Armory gloves wear pretty well and at $30 are cheaper than most of the other fencing gloves available. Alternatively, you can use a pair of TIG welding gloves, since they're rather supple and thin to provide manual dexterity. Try to find a pair that is all leather. Any logos or emblems can usually be removed with acetone or rubbing alcohol with a little effort.
Hoods:
Both of these hoods should be completely fine. I'd list Zen Warrior Armory, but theirs are cotton and quite thick, which makes them pretty warm compared to the hemp or linen ones listed here.
Gorgets:
Zen Warrior Armory seems to offer the cheapest gorgets that I've been able to find and they provide good protection for fencing. We have a number of them in our loaner gear and they hold up well to the hard usage they get there.
I don't own nor have I seen any of the Anshelm gorgets in person, however, my gorget is made in that style, and I find that it is a bit more comfortable to fight in. Anshelm's price on these ($75) is pretty good, as I can't find anybody else who is selling these for less than $90.
I don't own nor have I seen any of the Anshelm gorgets in person, however, my gorget is made in that style, and I find that it is a bit more comfortable to fight in. Anshelm's price on these ($75) is pretty good, as I can't find anybody else who is selling these for less than $90.
Swords:
Without explaining in detail, my recommendation at this point for new fencers is to save their money and buy the Darkwood Armory sword first. My experience is that fencers who get reasonably involved in SCA rapier ultimately purchase a DW blade within 2 years, even if they bought another sword first, so why not save up a bit more money and buy the DW?
As far as the price difference, I think ZWA's swords are actually selling for more money than the website suggests (based on my recollection of prices from Pennsic), so I think they come in closer to about $250-$275. I recommend either the R6 or the R9 swept hilt guards, and probably the 40" long sword (which is the longest they offer) with the heavier pommel that is recommended on the website.
As far as the price difference, I think ZWA's swords are actually selling for more money than the website suggests (based on my recollection of prices from Pennsic), so I think they come in closer to about $250-$275. I recommend either the R6 or the R9 swept hilt guards, and probably the 40" long sword (which is the longest they offer) with the heavier pommel that is recommended on the website.
As far as Darkwood armory's swords go, pay the extra $10 and get the bated rapier blade rather than the practice blade. You'll probably want either the 42" blade or the 45" blade (if you're around 6' or taller).
Accessories:
Shoes:
Boots by Bohemond - Shoes and Boots from various periods
Both of the above merchants provide reasonable reproduction shoes. They also both provide various other accessories such as knives, belts, leather pouches, etc. Bohemond's shoes are of higher quality, but I own shoes from both sources and they have all lasted for several years of heavy use (Lilies War & Pennsic + 20ish other events/year).
Both of the above merchants provide reasonable reproduction shoes. They also both provide various other accessories such as knives, belts, leather pouches, etc. Bohemond's shoes are of higher quality, but I own shoes from both sources and they have all lasted for several years of heavy use (Lilies War & Pennsic + 20ish other events/year).
I recommend most people purchase the additional rubber 1/8" Vibram non-slip sole to protect your shoes from asphalt and gravel, and to provide a bit more grip than the leather sole provides. I do not recommend purchasing the lugged sole that is available from Viking Leather Crafts. It doesn't look particularly good with the shoes and can provide too much traction for combat sports (which can lead to knee injury).
Bling (buckles, belt hardware, etc):
I recommend all of these merchants. They all produce good work, do quite a bit of historical research, and provide reasonably priced pieces (and also some really expensive stuff).
Clothing:
This is far from a complete list, however there are plenty of merchants who offer garb of questionable authenticity for lots and lots of money, so be careful. Revival Clothing and Historic enterprises are essentially the "big boys on the block" so to speak when it comes to buying garb. Their clothes are pretty good, authenticity-wise and they are well constructed. Some in the SCA consider their prices high, but I'd actually say that they offer pretty good bargains considering the amount and level of work that goes into making clothing.
Linen Garb's clothing is fairly basic, and can be used to give a good, generally medieval look. In my opinion, they aren't as authentic as the other merchants, but they're definitely good enough. Their prices are quite reasonable. Ultimately, I think you'll do better trying to build pre 1300's outfits from their garb.
I think I first came across Tailor Made Clothing as a merchant this past Pennsic, but apparently I know a lot of people who wear their clothes (as I know pretty much everybody in the photos). The clothing items pictured are of good quality, and ultimately if the listed prices are accurate, they are under-charging for their work. The downside here is that you'll probably have to wait for your piece to be made, whereas the other three merchants have a sizable inventory, and can probably fill orders immediately.
Fabric:
http://www.bblackandsons.com/ - Wool Fabrics
96 District Fabrics - Linen, Wool, Cotton, Silk - website not yet functional
96 District Fabrics - Facebook Page
Carolina Calicoes - Linen, Wool, Silk, Cotton Fabric
William Booth, Draper
Gray Line Linen
Fabrics-store.com is my usual go-to recommendation for people who are trying to get into linen garb while keeping the price down. Their linens are about $8/yd, which makes them cheaper than most other sources. However, you'll find higher quality linen at 96 District Fabric, JoAnn's, and sometimes at Carolina Calicoes. If you order from Fabrics-store.com, pay attention to their rotating sales, and use the coupon code "ilovelinen" for an additional 7% off.
B. Black & Sons is a great source for all sorts of wool. You'll pay around $20/yd, but their wool is high quality and they have a fairly wide selection of different kinds of wool.
96 District Fabrics and Carolina Calicoes are mainly available at events. Both merchants set up their shops at Pennsic, and they can also be found at big events along the east coast. Unfortunately, they don't seem to have online shopping set up, but you should be able to place an order by contacting them directly. 96 District has good quality fabrics. Their prices are a few dollars higher than fabrics-store.com's prices on linen (around $10/yd if memory serves). Carolina Calicoes is a little more hit-or-miss, as much of their inventory comes from wholesale lots and auctions, which means that it changes over time. They seem to reliably offer linen around $6 or $7/yd. I haven't worked with their linen much, but it seems to be of ok quality. They usually have a reasonable selection of colors available too. Keep an eye out for them at events, because they often have some unique fabrics and sometimes they have some killer deals going.
Both William Booth and Gray line offer higher quality linen. The price is slightly more expensive. William Booth offer offers a selection of twill tapes, trims, and other notions. Just be careful, as the site is geared a little more towards 18th century reenactors, so some products may be a bit out of period.
Trim:
Calontir TrimUltimately trim is a bit of a luxury. In order to keep monetary and labor costs down, I won't really offer much discussion on the use of trim to appropriately decorate your garb. However, if you want trim, this is probably your best bet for buying it. They travel extensively, so they may very well pop up at a major event close to you at some point.
Saturday, March 8, 2014
Mid 14th Century Helmets
Head: Your head is probably the most important thing to protect in SCA combat. First of all, it contains your brain, and that's kind of important (Trust me, I'm a Ph.D. candidate in Neurobiology :-D). Secondly, your face is also located on your head and it's fairly sensitive to being hit and has vulnerable bits like your eyes that help you to see. Thirdly, the way that SCA rattan combat works means that your head is going to be one of the areas that is hit most frequently. Because of this, you want your helmet to be strong and you actually want it to be fairly heavy (at least 10 lbs) as this additional weight will increase the inertia of your head, which will keep your brain from bouncing around in your skull as much. You also want a helmet that is made of sufficiently thick metal to keep it from denting too easily. While thinner material is legal, you should consider 14 gauge mild steel to be the absolute minimum thickness of metal for your helmet, and should probably look for something in 12 gauge steel.
There are 3 main styles of helmet that are appropriate for the mid 14th century.
 |
| Great Helm of Albert von Prankh, http://commons.wikimedia.org/wiki/File:KHM_Wien_B_74_-_Great_helm_of_Albert_von_Prankh,_14th_century,_front.jpg |
The great helm, would have been going out of style by the mid 14th century, but is simple enough that making one can be accomplished with minimal tools. These have the advantage of looking pretty badass, but typically have poor visibility. Furthermore, the flat surfaces (especially on top) can make this catch shots that would glance off other styles of helm.
This tutorial is fairly decent and describes how to make this style of helmet: http://www.arador.com/armour/how-to-make-a-great-helm/
So is this one: http://lochcairn.freeservers.com/classes/barrelhelm1.htm
This video: http://www.youtube.com/watch?v=3ASz5eHoiyE and this one: http://www.youtube.com/watch?v=v_TCzalrvTA are also helpful in figuring out how to make one. I
This video: http://www.youtube.com/watch?v=3ASz5eHoiyE and this one: http://www.youtube.com/watch?v=v_TCzalrvTA are also helpful in figuring out how to make one. I
 |
| A kettle helm made by Therion arms (http://therionarms.com/) |
The next style of helm is the kettle helm. Historically, kettle helms did not cover the face or the back and sides of the head, but several armorers make kettle helms with bar grills and slats that cover the rest of the head to make them legal for SCA combat.
 |
| A bascinet style helm with a fixed bar grill covering the face from Mad Matt's armory (http://www.madmattsarmory.com/inv_head.php) |
Finally, there's the bascinet. This style of helm is probably the most popular in the SCA. It is fairly simple to make, and the conical point makes it good at causing some shots to glance off the surface. The cheapest versions of these are made with a bar grill that is fixed to the helmet itself. More expensive versions have a hinge at the top that allows you to lift the bar grill and potentially swap it out with shaped face plates that are more common in later decades of the 14th century.
In general I recommend buying a helmet unless you have a particular interest in making armor, have access to some metal working tools, and have the time to spend on making one. As far as making one goes, the easiest of these to make is the great helm, as it requires only a few tools and can be riveted together (rather than welded). The other two styles require some more complex metal shaping, a few more tools (that aren't necessarily super expensive), and access to welding. I will address these possibilities in more detail in a future post, but for now my recommendation is to find an inexpensive "starter" bascinet style helm with a fixed bar grill. These typically run around $150 - $300 depending on some options.
Mad Matt's Armory offers several great helms, kettle helms, and bascinets at a reasonable price: http://www.madmattsarmory.com/inv_head.php
Iron Monger's munition's grade bascinet is a decent choice: http://ironmongerarmory.com/stock-helms
Helms are frequently for sale on the Armour Archive: http://forums.armourarchive.org/phpBB3/viewforum.php?f=3
Subscribe to:
Posts (Atom)